The wind is howling off the lake, pushing a -15°F wind chill through every microscopic gap in your rim joists, and your furnace just decided to quit. As a technician who’s spent more than three decades smelling burnt transformers and hearing the agonizing screech of a dry inducer bearing, I can tell you that silence is the worst sound in the world when it’s zero degrees outside. You’re not just looking for heat; you’re looking for a sequence of operations to kick in. But most of the time, when a homeowner calls me out in a panic, they’ve already been told by some ‘Sales Tech’ in a shiny shirt that their entire ‘high-efficiency furnace installation’ is a total loss. I remember a call last February for a guy named Miller who ran a local machine shop. A previous company had quoted him $12,000 for a new system because the ‘computer’ was fried. I walked in, pulled the panel, and found a scorched trace on the back of the board caused by a vibrating wire. A $200 board and some wire management saved him $11,800. That’s the difference between a technician and a salesman. In the 2026 landscape, these boards are more complex—integrating with ‘voice control setup Alexa Google’ and ‘dual fuel heat pump systems’—but the physics of the circuit remains the same. If your heater won’t start, don’t let a ‘Sparky’ or a salesman talk you into a replacement until you’ve looked at these three diagnostic steps.
The Sequence of Operations: Why Your Board is the Brain
Before we jump into the multimeter leads, you need to understand ‘Thermodynamic Zooming.’ Your furnace isn’t just a box that makes fire. It’s a carefully orchestrated dance of pressure and temperature. When the thermostat calls for heat, the control board (the Integrated Furnace Control or IFC) initiates a safety check. It verifies the ‘limit switch replacement’ hasn’t been bypassed and that the heat exchanger isn’t a ticking time bomb of carbon monoxide. If the board doesn’t see a closed circuit from the pressure switch, it won’t even think about sending ‘gas’ to the burners. This is where most rookies fail; they see no fire and assume the board is dead, when in reality, the board is doing exactly what it was designed to do: prevent your house from exploding or filling with CO. This is especially critical in ‘warehouse heating solutions’ where high-output systems can move massive amounts of air, creating static pressure issues that fool a board into a lockout state.
“The most expensive equipment in the world cannot overcome a bad duct system.” – Industry Axiom
Step 1: Decoding the LED ‘Rosetta Stone’
In 2026, we aren’t just looking at blinking red lights; we are looking at diagnostic codes that tell a story. If your board is getting power but the inducer motor isn’t spinning, look through the sight glass. That little blinking LED is the board’s only way to scream for help. A ‘3-flash’ might mean a stuck pressure switch, while a ‘solid red’ could mean the internal logic has failed. Before you go looking for ‘capacitor replacement services,’ check if the board is even trying to energize the motor. If you have a ‘pellet stove repair’ background, you know that sensors are everything. On a modern furnace, the board monitors the flame through a process called ‘flame rectification.’ The board sends an AC voltage to the flame sensor; if the flame is present, it acts as a diode, converting it to a tiny DC microamp signal. If the board doesn’t ‘feel’ that microamp return, it cuts the gas. If your board is dead-silent—no lights, no nothing—you need to check the 3-amp or 5-amp automotive-style fuse on the board. Usually, a shorted ‘limit switch’ or a contactor coil on the outdoor unit in a ‘dual fuel heat pump system’ has popped that fuse to save the processor.
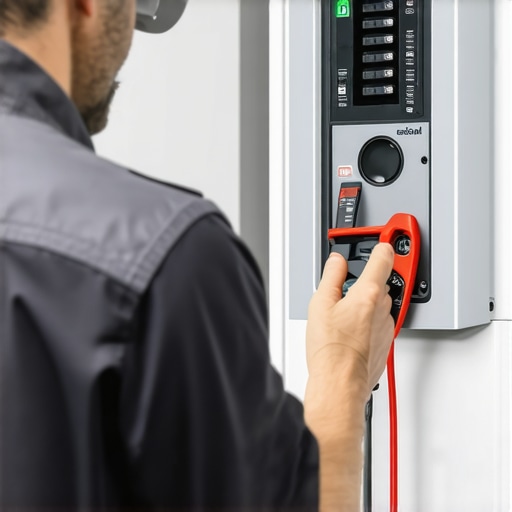
Step 2: Voltage Mapping and the 24V Rail
Pull out your multimeter. We’re looking for the ‘Sparky’ special—the 24-volt transformer output. A furnace control board is split into two worlds: the high-voltage side (120V) that runs the blower and inducer, and the low-voltage side (24V) that talks to your thermostat. If you have 120V coming in but no 24V coming out of the transformer, your board is a brick because it has no brain power. This is common in areas with ‘electric heater services’ where power surges during grid strain can cook the primary windings. If you have 24V but the board won’t respond to a ‘W’ call (Heat), jump ‘R’ to ‘W’ on the board terminals. If the furnace fires up, your problem is the thermostat or the wire buried in your wall. I’ve seen guys try to sell a ‘high-efficiency furnace installation’ when the only thing wrong was a ‘Tin Knocker’ accidentally drove a screw through the thermostat wire while installing ‘MERV filter upgrades’ in the return air drop. Don’t be that guy. Check the voltage at the source.
“Standard 62.1 requires specific ventilation rates to ensure indoor air quality is maintained, regardless of the heating cycle status.” – ASHRAE Standards
Step 3: The Mechanical Relay Audit
Listen closely. When the board receives the call for heat, you should hear a distinct ‘click.’ That is a mechanical relay closing to send 120V to the inducer motor. If you hear the click but the motor doesn’t move, the relay is likely pitted or ‘carboned up.’ This is common in older boards or systems without proper ‘dehumidification services,’ where high moisture levels in a basement can corrode the internal contacts of the IFC. If you don’t hear a click at all, the logic gate on the board is likely toast. This is the moment where we decide on ‘top HVAC repair strategies to extend your systems life’ versus a full replacement. If the furnace is 20 years old and the board costs $600, you’re throwing good money after bad. However, if it’s a five-year-old unit and the ‘limit switch replacement’ didn’t fix the issue, a board is a viable repair. Always check the back of the board for ‘ghost marks’—brownish or black discolorations that indicate a component has overheated. In the 2026 models, keep an eye on the communication ports for ‘voice control setup Alexa Google.’ Sometimes a ‘smart’ component can actually drag down the data bus and lock the board out.
Physics vs. Marketing: The Airflow Reality
At the end of the day, your control board is just a safety guard for the heat exchanger. If you’re constantly dealing with ‘limit switch’ trips, it’s rarely a bad switch. It’s usually because you’ve got a ‘Tin Knocker’ who didn’t size the return air correctly or you’ve stuffed a high-restriction filter into a system not designed for it. When the airflow is too low, the heat exchanger temp skyrockets, the limit switch opens, and the board shuts everything down to prevent a fire. You can replace the board ten times, but it won’t fix a ‘choked’ system. If you want to avoid these emergency calls, look into preventative heating maintenance. Understanding the tips for choosing the best heating service can save you from the ‘Sales Tech’ who only knows how to read a commission chart. If you’re stuck in the cold right now, contact us before you let anyone condemn your system. There’s a lot of life left in that ‘iron’ if you know how to talk to the ‘brain.’ For more on keeping your unit running, check out top repair strategies or learn about new heat pump solutions that might be a better fit for your climate zone.
This post hits home because I’ve often had to troubleshoot furnace control boards that seem dead but are actually just showing diagnostic codes or fuse failures. I appreciate the detailed steps—especially the emphasis on understanding the LED codes and checking the transformer output. In my experience, a lot of system failures are due to simple issues like blown fuses or low voltage, which DIY homeowners can test if they have a multimeter and know what to look for. It’s also interesting how you highlighted the importance of airflow and system sizing, because many times, the real culprit isn’t the control board but improper duct work or restricted filters that cause the limit switch to trip constantly. Have you noticed any new diagnostic tools or smart sensors in 2026 that make these tests easier or more accurate? I’m curious about the future of AI diagnostics—do you see those playing a bigger role before replacing control boards?